Mortar Joint Function and Failure: Understanding the Space Between Your Bricks
Here’s something most building owners don’t realize: the mortar holding your masonry together is actually engineered to fail. Understanding why—and recognizing when it’s happening—can save you tens of thousands in repair costs.

Concerned about your building’s mortar? Get a professional facade assessment from RSI’s restoration experts.
Request a Free ConsultationWhy Mortar is Designed to Fail First
When you look at a brick or stone building, your instinct is probably to worry when you see deteriorating mortar. That seems like a problem, right? Here’s the counterintuitive truth: mortar deterioration isn’t necessarily a sign that something went wrong—it’s often evidence that the system is working exactly as designed.
Mortar serves two critical functions in masonry construction. First, it’s the bonding agent that holds individual brick or stone units together, creating a unified structural wall. Second—and this is the part most building owners don’t understand—it functions as a sacrificial material intentionally engineered to be weaker than the masonry units themselves.
“The mortar essentially acts as both the bonding agent and a sacrificial material. Ideally, the mortar should deteriorate before the brick or stone does.”
— Tayton Eggenberger, Branch Manager, Minnesota, RSI
Think of it this way: brick and natural stone are permanent, expensive materials that are difficult to replace without dismantling significant portions of a facade. Mortar, by contrast, is relatively inexpensive and can be removed and replaced through repointing without disturbing the masonry units. By accepting weathering, moisture movement, and thermal stress first, mortar protects your more valuable materials from damage.
This sacrificial design is intentional and smart. The mortar essentially takes the hit so your brick and stone don’t have to. But here’s where building owners get into trouble: this protective function only works when the mortar is maintained. Once mortar deterioration progresses past a certain point, it stops protecting and starts allowing damage to accelerate. The key is understanding what normal sacrificial wear looks like versus what signals a maintenance emergency.
Four Common Mortar Failure Modes
Mortar doesn’t fail all at once—it deteriorates through specific, recognizable patterns. Understanding these four failure modes helps you identify problems before they escalate into structural concerns. In Midwest climates, freeze-thaw cycles accelerate every one of these failure patterns.
Cracking
Mortar cracks appear as visible lines running through joints, often forming at points of stress concentration. Hairline cracks are normal aging, but cracks wider than 1/16 inch create pathways for water infiltration. Once water enters these cracks, Midwest freeze-thaw cycles cause ice expansion that widens the crack with each temperature swing. You’ll typically see this pattern develop first in areas with high moisture exposure—building corners, around windows, and anywhere water can pool or run down the facade.
Erosion
Erosion manifests as mortar that looks sandy, crumbly, or recessed significantly behind the face of the brick or stone. This happens when the binding agents in mortar break down from moisture and weathering, leaving behind loose aggregate. Freeze-thaw damage accelerates erosion dramatically—water absorbed into deteriorated mortar expands when it freezes, physically breaking apart the material from within. Erosion is particularly aggressive on parapets, ledges, and horizontal surfaces where water sits rather than sheds. Once erosion creates joints recessed more than a quarter-inch, the rate of deterioration typically accelerates.
Separation from Masonry Units
This failure mode appears as visible gaps between the mortar and the brick or stone—essentially, the bond fails and the materials separate. You might notice mortar that looks intact but has pulled away from one or both sides of the joint, creating a void. This separation allows water to travel behind the mortar where it can’t dry out effectively. In freezing conditions, trapped water becomes trapped ice, expanding and pushing the materials further apart with each cycle. This type of failure is common in walls with inadequate drainage or where incompatible mortar was used during previous repointing. High-risk locations include anywhere moisture becomes trapped: below grade, behind downspouts, or in areas with failed flashing.
Improper Joint Profiles
The shape of the mortar joint—its profile—directly affects how water behaves on your building facade. Proper joint profiles are either slightly recessed or shaped to shed water away from the joint. Improper profiles include joints that are flush with the brick face, joints with concave depressions that collect water, or joints that actually protrude past the masonry units. These problematic profiles allow water to sit on or in the joint rather than running off. When that standing water freezes, it creates damaging expansion cycles. You’ll often find improper joint profiles in buildings that were previously repointed by contractors who didn’t understand masonry best practices—the joints might look “neat” but function poorly. Parapets and ledges with improper profiles deteriorate especially quickly because they face both vertical rain and horizontal surface water.
What Happens When Mortar Failure Goes Unaddressed
Most of us understand that ignoring the check engine light in our car eventually leads to bigger, more expensive problems. The same principle applies to deteriorating mortar joints, but the consequences unfold differently—and often invisibly—behind your building’s facade.
Once mortar joints fail to the point where water can penetrate behind the masonry wythe, a cascade of problems begins. Water that infiltrates through failed joints reaches steel components embedded in the wall system—shelf angles, lintels, ties, and reinforcing bars. Unlike mortar, which is designed to weather and erode, these steel elements are designed to last the lifetime of the building when kept dry. Introduce moisture, and corrosion begins. Corroding steel expands, which creates pressure that cracks surrounding masonry. You might see this as horizontal cracking that follows the line of a lintel or shelf angle—that’s not mortar failure, that’s structural steel corrosion caused by mortar failure that happened years earlier.
Water intrusion through failed mortar joints doesn’t stop at steel components. It continues inward, potentially reaching wall cavities, insulation, and interior spaces. Once moisture reaches these areas, mold growth becomes a concern, particularly in climates where temperature differentials create condensation. Interior damage from exterior mortar failure is often discovered only after visible signs appear inside—staining, efflorescence, or worst case, mold on interior walls.
The cost differential between addressing mortar deterioration early versus after secondary damage occurs isn’t incremental—it’s exponential. Repointing mortar joints might run $15-30 per square foot. Replacing corroded structural steel, rebuilding damaged masonry, and remediating interior moisture damage can easily cost ten times that amount.
Building owners sometimes delay mortar maintenance because the deterioration doesn’t look urgent. The building is still standing. The brick looks fine. But by the time deterioration becomes visually dramatic, the hidden damage is often already extensive. As Tayton notes, this is exactly why RSI emphasizes proactive rather than reactive maintenance: addressing mortar deterioration before it cascades into structural concerns is always more cost-effective than waiting for a crisis.
What Building Owners Can Check from Ground Level
You don’t need specialized equipment or rooftop access to begin assessing your building’s mortar condition. A thorough ground-level visual inspection can identify many concerning patterns that warrant professional evaluation. The best time for this inspection is spring—after Midwest winter freeze-thaw cycles have done their damage but before summer plant growth obscures lower portions of the facade.
Brick Cracking
Look for cracks that run through the brick itself, not just through mortar joints. This often indicates that the sacrificial mortar system has failed and stress is now being absorbed by the permanent masonry units.
Mortar Cracking
Examine mortar joints for cracks wider than 1/16 inch. Pay particular attention to stepped cracking patterns that follow the mortar joints in a staircase pattern—this can indicate settlement or structural movement.
Stone Deterioration
If your building includes stone elements, look for flaking, spalling, or faces that appear to be delaminating. Stone deterioration often begins at the bottom of the stone unit where water collects.
Sealant Failures
Check caulk joints around windows, at control joints, and where different building materials meet. Failed sealants often appear pulled away from surfaces, cracked, or hardened and brittle—all allow water entry.
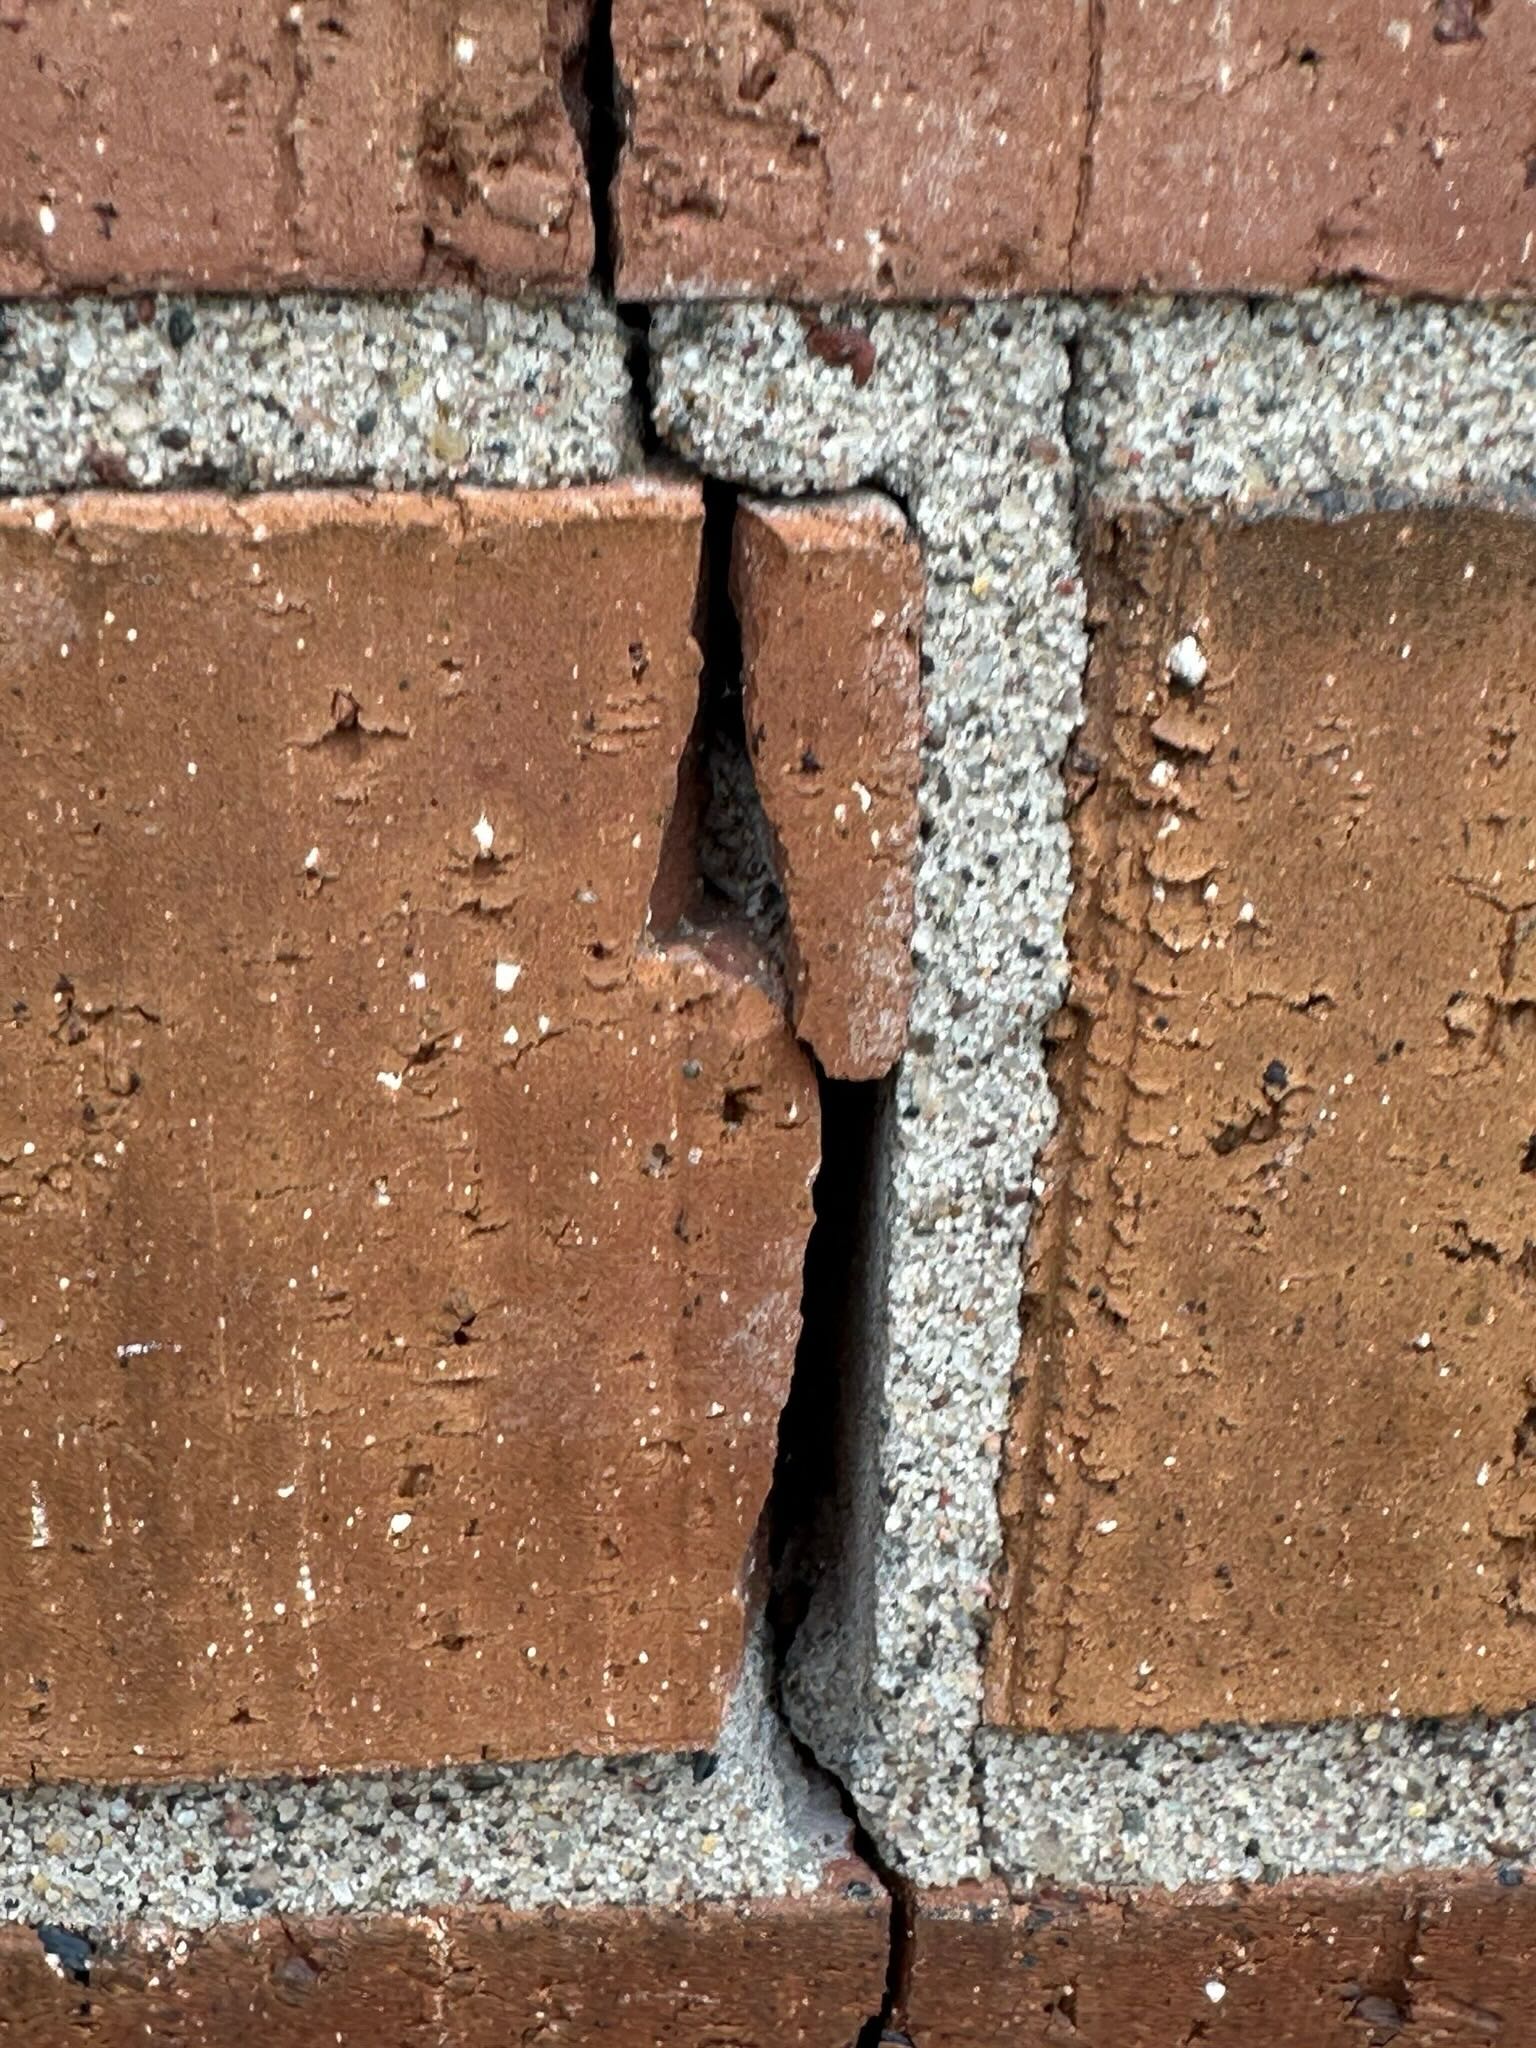
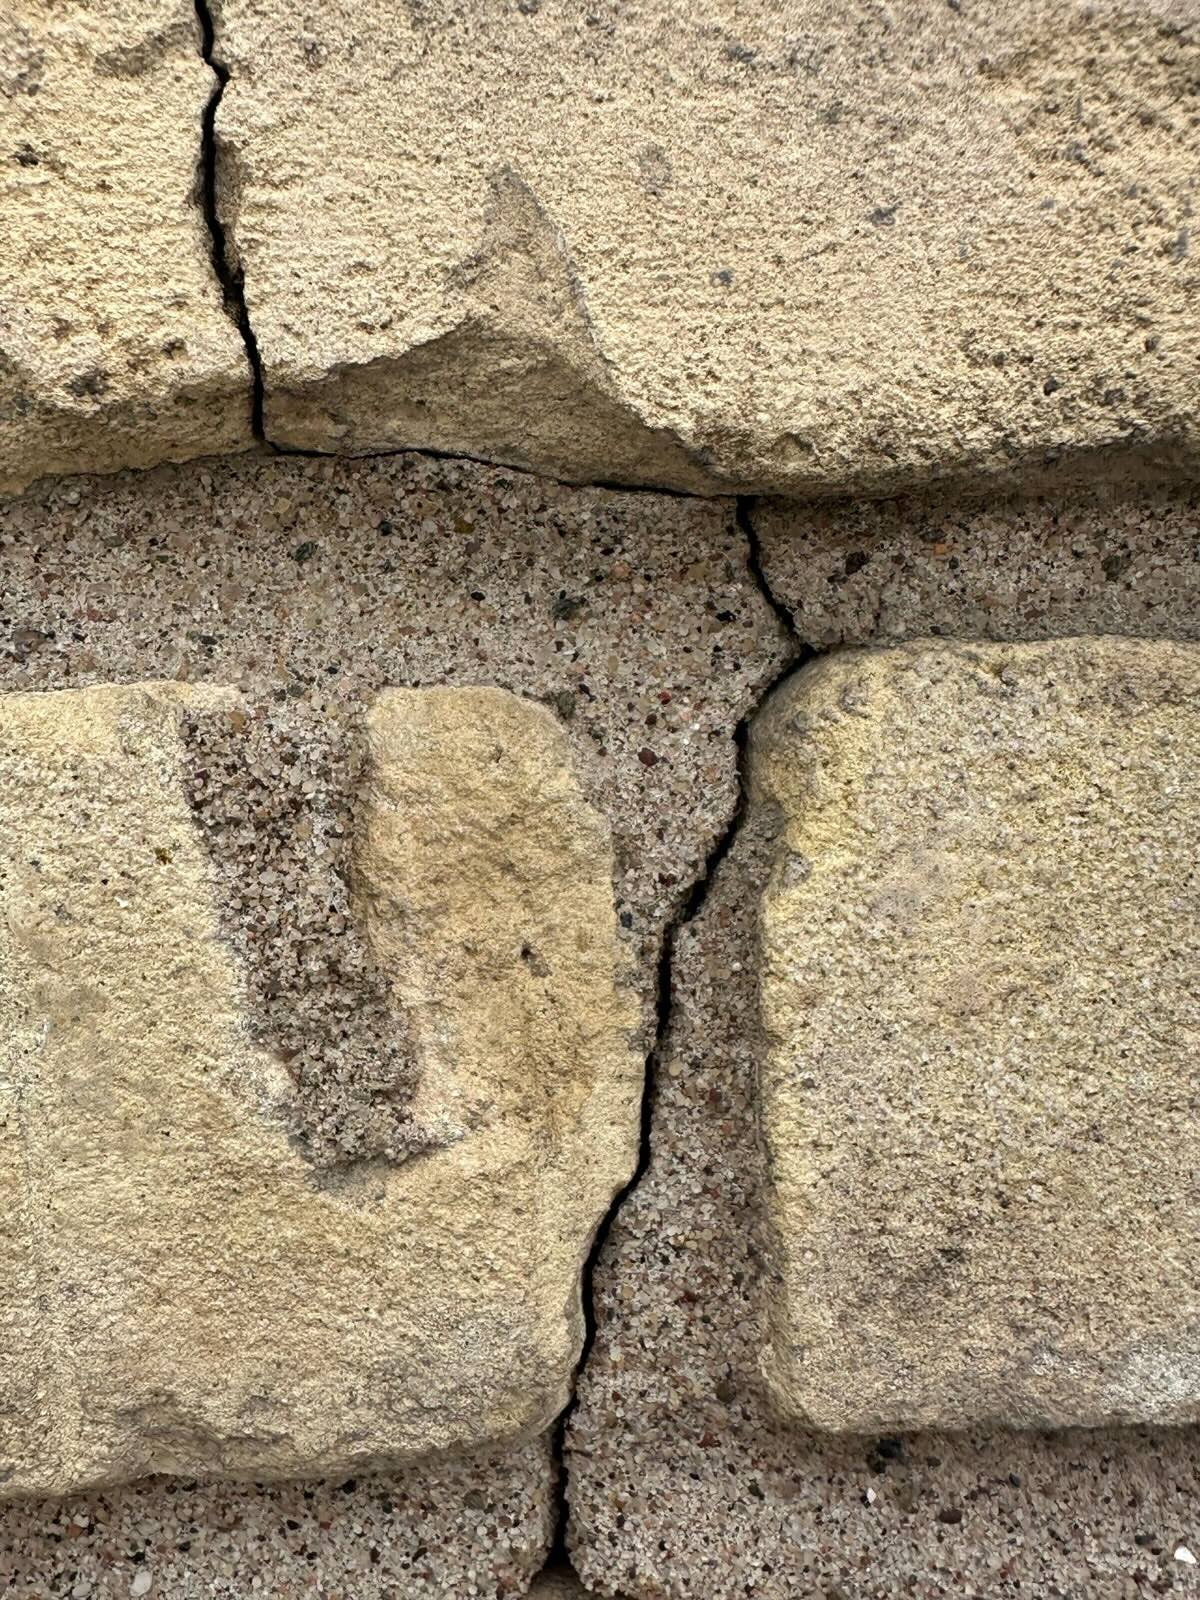
Examples of visible mortar deterioration patterns
During your inspection, pay special attention to areas where water naturally concentrates or moves: below windowsills, at building corners, near downspouts, and around any architectural features that project from the facade. In the Midwest, we experience temperature swings from 45°F to 0°F in a single week during winter months—these rapid freeze-thaw cycles cause the most aggressive mortar deterioration in areas that stay wet.
Document what you find with photos, noting locations and approximate heights. This documentation provides a baseline for tracking deterioration over time and gives restoration professionals valuable information for prioritizing repair strategies. What building owners often discover during these inspections is that mortar condition varies significantly across different elevations and exposures—the north side of your building likely shows different patterns than the south side because of sun exposure and prevailing weather patterns.
When to Move from Self-Inspection to Professional Assessment
Your ground-level inspection provides valuable information, but it only reveals part of the picture. Professional facade assessments operate on two levels that building owners typically can’t access: comprehensive close-up examination of all elevations including rooftop elements, and technical analysis of underlying conditions that aren’t visible from the ground.
Comprehensive assessment involves physically accessing all portions of the building envelope—often via lift equipment or rope access systems—to examine mortar joints, masonry units, steel components, and waterproofing systems up close. Experienced restoration professionals can identify patterns that predict where deterioration will accelerate next, not just where damage currently exists. They can also distinguish between cosmetic deterioration that can be monitored and structural concerns that require immediate intervention.
The second level of assessment is technical: understanding the interaction between building systems, identifying the root causes of deterioration patterns, and developing repair strategies that address causes rather than just symptoms. This is where field experience matters significantly. A contractor who only knows how to repoint mortar might address visible deterioration without recognizing that failed flashing or inadequate drainage is causing the problem—which means the newly repointed mortar will fail again in short order.
“We may not be the cheapest option, but we are the option that usually doesn’t get the call back. Building owners often contact us after hiring less expensive contractors whose repairs failed—they end up paying for the work twice.”
— Tayton Eggenberger, Branch Manager, Minnesota, RSI
Timing matters for professional assessments. The ideal schedule for Midwest buildings is a comprehensive professional inspection every five years, with additional assessments triggered by obvious deterioration, water intrusion events, or before major capital planning cycles. If your building is approaching 30-40 years since original construction or last major facade restoration, that assessment interval should shorten to every 2-3 years—this is when original mortar and waterproofing systems typically reach the end of their service life.
The value proposition of professional assessment isn’t just identifying what’s wrong—it’s developing a prioritized, phased maintenance plan that allows you to address the most urgent concerns first while planning and budgeting for future work. This proactive approach transforms facade maintenance from an emergency expense into a manageable, predictable capital planning item. Building owners who adopt this mindset consistently spend less over the building lifecycle than those who wait for failures to become urgent.
Protect Your Investment with Expert Facade Assessment
Understanding mortar function and failure modes puts you ahead of most building owners—but knowledge alone doesn’t stop deterioration. RSI’s facade assessment services provide the comprehensive, close-up examination your building needs to identify problems before they cascade into costly structural repairs. Our team combines field experience with technical expertise to develop maintenance strategies that fit your timeline and budget.